Calculated Pricelists Setup and Pricing Strategy

If managing prices on the product level is insufficient for your operation and you’re looking to implement calculated pricelists that allow you to manage discounts, margins, rounding strategies, and scheduled price changes, then the Price computed from formulas is the way to go. With this option, you can adjust the base prices set at the product level to implement a variety of pricing strategies using pricelists. These pricelists are then managed outside of the product views and can be applied as broadly as to your entire catalog or as granularly as to a single variant of a product.
To enable the calculated pricelist option, select the Sales application from the main dashboard, locate the Configuration option in the menu at the top, and select Settings from the dropdown. Once the settings page is loaded, scroll down to the Pricing section and ensure that the “Multiple Sales Prices per Product” box is checked. The Prices Computed From Formulas will be the second option below; simply select this option and click Save.

Prices Computed From Formulas
Once you’ve selected the Prices Computed From Formulas option in settings, you can click on the Pricelists link just below the selection to start creating and editing your pricelists. You can also access the pricelists at any point from the Products menu in the Sales app or the Pricing menu in the Steersman’s PIM app. You can also access a Pricelist report via the Reporting menu in the Sales app to see which customers have which pricelist assigned to them.

By default, the Pricelists view contains a Public Price list for each of your enabled currencies, which includes all prices specified at the product level for all items in your catalog. You can keep these lists and use them as a base for other pricelists, or you can replace them entirely with other pricelists that make more sense for your business.

Note: If you’re looking to configure pricelists for currencies not displayed in this view, you would need to make sure you enable the additional currencies via settings in the Accounting app.
Create a New Calculated Pricelist
You can create a list that sets all the products in a specific category to the same value, make another list that discounts public prices by 40%, or create complicated pricing formulas that generate prices on the fly. To get started, simply click the Create button at the top left of the Pricelist view and enter a name for your new pricelist.

See Pricelists in Product Views
Because this pricing option is enabled, all prices are managed in the pricelists, and you won’t see any of them represented on the product view. Since it can often be helpful to both the Sales Team and Management to see all the various prices set for a given product on the product level, Steersman offers an optional module that does exactly that.
If installed, a Show Pricelist in Products checkbox will appear at the top of the form when creating a new pricelist, the Pricelists view will be updated with a column that will show if a list has this flag set, and a Pricing tab will appear in the Product view for each of your products.

If a pricelist has been configured to include a particular product and the Show Pricelist in Products checkbox is checked, that pricelist will appear in the product view, along with the calculated price for the given product.

This view is intended to provide your sales team with prices at a glance and is not editable. To add or remove price lists from a product or adjust the calculations in any way, you’ll need to access the pricelist directly.
Multiple Currencies
If you have multiple currencies enabled via your Accounting app, you’ll be able to configure pricelists that are currency-specific by specifying the relevant currency from a menu at the top.

You can also specify Country Groups for which the pricelist will be valid by clicking Add a line and selecting the countries you’d like to limit this pricelist to; however, in most instances, this field will be left blank.
Pricelist Items: Global to Granular
The next step is to specify which categories, products, or variants you’d like this price list to apply to, or whether it will apply to everything.
By default, the pricelist will have a single entry called All Products that will apply no price modifications on a global level to everything in your catalog. You can click on this to modify it or leave it as a catch-all, and add additional criteria by clicking on Add a line.

Adding a New Pricelist Item
When you click the link to add a new pricelist item, a pop-up menu appears with various configuration settings. The first selection you’ll need to make is which product level to apply the price list to. As you consider the different options, remember that you can specify more than one set of pricing criteria for each pricelist.
Global
If selected, this setting will apply the price computations to every single item in your catalog. Since this will apply to all products, no further options are available.

Product Category
This option allows you to specify a product category to which the price computations will be applied. Once selected, a dropdown will appear in which you can either type or search for the category you wish to use. If you would like to configure this pricelist to include several different categories, you’ll need to add a separate entry for each one.

Product
This option allows you to specify a product to apply the price computations to, which is helpful if you’d like to manage the pricing strategy for a particular product a bit differently than the rest of your catalog. Once selected, a dropdown will appear, allowing you to either type in or search for the product you wish to use. If you would like this pricelist to cover several products, you’ll need to add a separate entry for each one.

Product Variant
This is the most granular option, allowing you to specify a product variant to which the price computations will be applied. Once selected, a dropdown will appear, allowing you to either type or search for the exact product variant you wish to use. If you would like this pricelist to cover several variants, you’ll need to add a separate entry for each one.

Let’s say that while your current inventory of square cushions is as it should be, you appear to have an excess of blue ones. You can create or adjust a pricelist to set the price for this specific variant to be lower than the rest.
Min Qty and Date Range Settings
You can specify a minimum quantity of items that must be ordered to enable this price via the Min Quantity field at the top. You can also schedule price changes by populating the valid start and end dates for the pricelist.

Price Computation
The next decision you will need to make is how you’d like to compute the prices for the product list you’ve configured in the top section.
Fix Price
You can set a single price for all products, a single category of products, a single product, or even just a single variant of a product, depending on how you configured the section above.
Percentage (discount)
This option will apply a single percentage discount to the Public Price set for all products in the list.
Formula
We’ll spend a bit more time on this section, as there are many moving parts involved in a formula-based price computation. This option allows you to specify which price list you’d like to use as your base, the discount you’d like to apply to it, any markups you’d like to add, the rounding method to use, or whether you’d like to specify a minimum or maximum margin over the base price.
Based on
The “Based on” dropdown will have three options for you to choose from: Public Price, Cost, and Other Pricelist.
- Public Price is the default pricelist we’ve mentioned before that contains all the prices set in the Sales Price field on the Product level.
- Cost is a list containing all the product cost values stored in the Cost field on the Product level.
- Other Pricelist allows you to select other pricelists to use as your base. If this option is selected, a separate field called Other Pricelist will appear below, allowing you to choose the pricelist you’d like to use.
In the following example, I selected the Other Pricelist option and specified the Wholesale pricelist as the base price for my calculations. I’ll revisit this example in the Rounding Method section below to explain the calculations used here.

Price Discount
This simple field will take the base price specified and apply a percentage discount to it. If you chose the Public Price as your base and didn’t set any other criteria for your calculations, this will behave the same way as selecting the Percentage option in the section above.
Surcharge
The field directly to the right of the Price Discount is the Surcharge that can be added or subtracted from the price calculation. If this value is positive, then that dollar amount will be added to the calculated price after the discount is applied. If the value is negative, that amount will be subtracted instead.
Rounding Method
This field adjusts the calculated price to be a multiple of the specified value. Rounding is applied after the discount is calculated, but before the surcharge is added.
- If you want your prices to be rounded up to the nearest $10, you’d set this field to 10
- If you want your prices to always end with $0.99, you’d set Rounding to $1 and the Surcharge to -$0.01
- If no value is specified in this field, no rounding logic will be applied to the final calculation
In the example calculation I mentioned previously, where I used a Wholesale pricelist as the base, I also set the Rounding Method to $10 and the Surcharge to -$0.01. This means that the system will take the wholesale price for a given product, apply a 10% discount to it, round it up to the nearest $10 increment, and subtract $0.01.
Product Sales Price: $250 Wholesale Price: $125 ($125 w/50% discount applied) New Calculated price shown to customer with this pricelist: $119.99
Min. Margin
As you assemble the logic for your price calculations, you may want to ensure that the final price is always a specific dollar amount above the base price. In this case, specify the dollar amount for that margin here. One application for this is if you’ve set your base price as ‘Cost’ and you want to ensure that, regardless of the discounts you implement, you always make a profit on the sale.
Max. Margin
Similarly to the Min Margin covered above, the Max Margin allows you to control the maximum dollar amount over the selected base price that will be allowed after taking all other calculations into account. If you specify a minimum margin, you must also specify a maximum margin, as there’s a rule in place that prevents the minimum from ever exceeding the maximum.
Multiple Pricelist Items
Now that we’ve covered how to create a single pricelist item, I wanted to mention that you can have as few as one entry or as many as you need to build the intended pricelist you have in mind.
Let’s say you would like to offer a wholesale price to some of your customers, but not for all products in your catalog. You can apply the discount to the All Products list, create a Product Category for the items you don’t wish to discount, and create another list specifying no discount for this category. Here is what that would look like once set up:
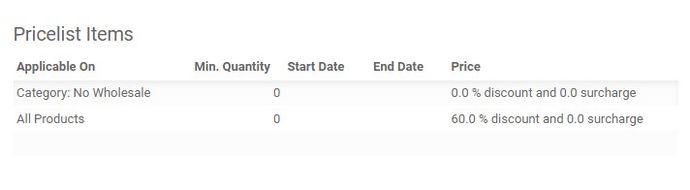
With this setup, customers with this pricelist assigned to their account will automatically receive a 60% discount on all products except those within the “No Wholesale” category.
Here’s another example of multiple criteria implemented for a single pricelist:
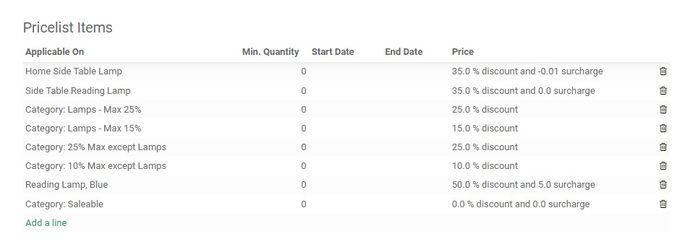
In this example we have set up two specific products with 35% discounts, organized some Lamps in our inventory into discount categories and applied the discounts accordingly, assigned a single variant (the blue lamp) a 50% discount and made sure that all of our other saleable products not covered in any of the above criteria do not reflect any discounts.
Website Fallback Pricelists
The next section that you can configure for a pricelist is Website Fallback Pricelists. This particular section will only show up if you have an ecommerce solution enabled as part of your implementation. If your setup does not include a website, you can skip this section.
If you have only one website, or if you’ve set up your pricelists in a way that each one covers your entire catalog, you can disregard this section. However, if you have multiple sites with separate sets of pricelists for each, you may want to specify a fallback pricelist. This will ensure that if a pricelist you have configured for a particular customer is not available for the site the customer is on, a price from the fallback pricelist is used instead.

This is useful if a customer who typically uses a US website and is set up to use a US pricelist decides to order something from the Canadian website instead, or vice versa. You can set a Canadian equivalent of the US pricelist as the default and ensure that customers never encounter issues.
Discount Policy
There is one more setting that may appear on the form when creating a new Pricelist, and that is the Discount Policy. If you have Discounts enabled in the Configuration Settings, you can control whether the price a customer sees is just the discounted price or if the original price will also be displayed, but crossed out and replaced with the discounted price. This option is useful if you want the discounts you’ve set up to be transparent to the customer.

Once this feature is enabled, a new entry will be added to the Pricelist when it’s in Edit mode. The Discount included in the price will be selected by default, so if you would like to enable the price transparency for this particular pricelist, you’ll need to change the option to Show public price & discount to the customer as shown here:

Jobber Price Setup
You might have a situation where you have a separate external price list for your catalog that is not derived from the public price in any way. For example, the Auto Parts supply industry commonly utilizes a Jobber price. This price usually falls somewhere between the MSRP and the wholesale distributor price, and generally varies depending on the vendor relationship with the business.
Since a Jobber price is not usually related to the Public or MSRP price in any way, it will need to be set for each product within this new pricelist. Once set up, you can use your stored Jobber Pricelist to generate a variety of other calculated pricelists, however you like, using the steps I’ve described above.

Within the pricelist, each product would need to be added as shown here:

It will take some time to enter all the products and their prices manually, but once done, you can generate several other pricelists using this one as a base. If there are any future price changes, you can make them in this list and be assured that everything else will be updated automatically, as configured.
Conclusion
I’ve described the various ways to configure calculated pricelists for your operation using Steersman’s Odoo. It’s a powerful feature that gives you complete control over price management for your entire product catalog, regardless of its size or variety. However, if you’re looking to implement a more basic pricing strategy, a simpler pricelist option is available. To learn more about managing prices on the product level instead, take a look at Simple Pricelist Setup and Pricing Strategy post.
Related posts

Simple Pricelist Setup and Pricing Strategy
Implement a more strategic pricing strategy and get more control over your product catalog with simple pricelists.

Choosing a pricing strategy for your operation in Odoo
Learn the various pricing strategies available in Steersman's Odoo for use by sales and on ecommerce websites

How to Assign Pricelists to Steersman's Odoo ecommerce
Instructions for how to assign one more more pricelists to Steersman's Odoo ecommerce websites.

How to Assign a Pricelist to a Customer in Odoo
Instructions for how to assign a pricelist to a customer account in Odoo.